Link to Photos of:
Where Did I Learn This?
The most important things I learned were:
Songs | Bookbinding | Textiles | Manuscripts | Project Gallery
The Sequence of Medieval Painting:
- Draw out design with a pencil.
- Redraw the lines with a watery minium (a lead red paint.)
- Erase the pencil and get all the dust away from the page.
- Apply gesso.
- Apply gold.
- Put on base colors.
- Put on some mottling of darker and lighter colors to show highlights and shadows.
- Add white highlights.
- Outline it all with black ink.
The following pages give directions and information about:
- Preparing Gesso
- Gilding
- Cutting a pen from a feather
- Preparing Vellum & Parchment as a writing surface
- Stores, Books, and the class I took to learn all this
Gilding:
- Lay the gesso into the area you wish to gild using a pen.
- Wait for it to dry.
- Lightly scrape the surface of the gesso with a knife and then burnish it to make sure the surface is smooth and shiny. The burnisher's agate head should not touch the table or human sin. Prior to using blow hot air from your mouth on it, wipe down thoroughly with a silk cloth. When finished place the burnisher on a piece of soft cloth. Any impurity on it's surface will mess up the gold, causing it to be dull or to come off. Clean the burnisher between each use with the silk, to prevent any gold or gesso dust from accumulating.
- Get gold sheet ready (Sheets of gold are called "Transfer gold" in the UK, but "Patent Gold" in the US.)
- With your mouth as close as possible to the gesso, blow 4 or 5 hot breaths onto it. The part of the breath that carries moisture is the very last bit that you can squeeze out of your lungs. So breath deep and exhale completely.
- Place gold immediately on the gessoed area and press down with the ball of finger very firmly, making sure to get the edges of the "pillow shaped" gesso. (The gesso only remains sticky for 3 seconds after you blow on it. So you have to have the gold sheet ready.)
- Repeat this process several times to build up a layer of gold. (A really good quality gilding job will have 2 or 3 layers of single gold and then 3 or 4 layers of double gold.
- After a moment, burnish it lightly with the agate burnisher. Burnish it more strenuously later that day when it has had a chance to completely set up.
- Clean off any extra gold on the page with a dry paint brush.
Tips about Gilding:
- Often the ready-made gesso that you can buy is not ground fine enough and will ruin your burnisher.
- If possible, do gilding when the weather is right. Do it in the morning, never the afternoon. If you have to gild under bad conditions then mix up a special batch of gesso with different proportions. (recipes to follow.)
Recipe for Gesso:
- 8 parts slaked plaster of paris (Buy dental mold plaster. To slake it: Fill a bucket with distilled water. Scatter plaster powder on the water. Stir for 20 minutes to an hour. Let settle, pour off excess water, let harden, break into cakes.)
- 3 parts lead carbonate
- 1 part sugar (canning sugar that does not contain pectin).
- 1 part glue ("Seccotine" fish glue, or another glue that is liquid at room temperature. In the middle ages, they would have used egg white.)
- Touch of Armenian Bole (to add color.)
- Fold a piece of paper and measure the amounts in little heaps on the paper so that you can stop and count how many spoonfuls you've scooped. When it is the right number poor it in a mortar. Then measure the next dry ingredient.
- Grind all dry ingredients with a pestle until smooth (Porphyry stone is excellent for grinding.)
- Add fish glue to the mortar, wash the extra glue off the spoon with a pipet, letting the water drops fall into the mortar as well.
- Stir with pestle until it sounds sticky.
- Blob nickel sized blobs onto plastic wrap and let dry, or use as is. (adding water to reconstitute it.)
(Recipe is from Cennino D'Andrea Cennini in 1437.)
Changing the Recipe for the Weather
Under the Best Conditions: Increase to 9 parts plaster of paris, leave other amounts alone. This will give a particularly shiny gold that burnishes up the best. (Good conditions would be over 70% humidity, early morning, in a cool still unairconditioned room.)
Under the Worst Conditions: Increase sugar and glue to 1½ parts. This will make it easier to stick the gold down, but it won't burnish up as bright. (Bad conditions would be humidity lower than 50%, the sun is up, and the room is airconditioned.)
Reconstituting Gesso to Use
Reconstitute gesso (gesso sottile) by putting a small amount in a jar, put two drops of water on it, tip the jar so the gesso and water are together and let it sit for an hour. Then add another couple of drops and carefully stir until it is like thin runny cream. Beware of adding air-bubbles. (The medieval remedy for air bubbles is to stick your finger in your ear, coat it with earwax and gently stir the gesso with that finger. The modern equivalent is oil of cloves.)
Period Notes:
- The lead fills in any holes left by the plaster and also acts as a fungicide to prevent the gesso from molding.
- Cennini says to slake the plaster multiple times, but this is probably not to leach the heat out (to "slake" it) as to just pour off impurities with the extra water. Modern plaster is clean, so you only have to do it once.
- Honey was probably used in some recipes in period (Cennini specifies sugar candy.) And one of the people following in William Morris' footsteps in the 1800s, Araily Hewitt, developed a honey recipe, however, he and his followers never passed on the secret and so it went to the grave with them.
- Egg yolk is sometimes used in painting, but it sometimes transfers to the other side of the page over time. Egg white is safer to use in a book where the pages will press together.
- If one uses egg white: separate the egg yolk out, then beat the egg white to remove the stringiness. It will have froth at the top and runny liquid underneath, it's the runny stuff underneath that you will use.
- Jehan le Begue in 1431 had gave these instructions, "...when you wish to lay on the gold, go into a closed place and choose a proper time, as has been before mentioned. And having chosen a fit time and place, and used the proper precaution..." What this means is that you should get right to it after hearing Matins at three in the morning, say around five. That way the air is the most moist. You close yourself in, shut all the windows and doors and then start gilding.
Quills:
What Feathers?
- The first five flight feathers from the wing of any bird are appropriate to use for a pen.
- Molted feathers are white at the quill end and very soft. They harden as they get older. (Store them in a bundle and hang them to dry. Or to cure them faster they can be heated in a dutching box.)
- Right handed people need the left wing feathers, left handed people need the right wing feathers. (The feathers should move away from the body.)
Definitions of the Feathers:
- Pinion feather- The first feather on the leading edge of the wing. The barbs are very narrow on one side, the barrels are short but tough. (These are the best feathers for pens.)
- Seconds- the second and third feather on the wing. They can be identified because they have a slight bulge of barbs growing where the pinion feather was covering them.
- Thirds- The fourth and fifth feathers on the wing. They have longer barbs on the narrow side, longer barrels, and are also weaker.
Tools Needed:
- Cutting board
- Pen knife with round sharp blade (Can use a sturdy exacto knife with a round blade.
- Tiny crochet hook
- Cup of water
Cutting the Quill:
- Cut off the top part of the feather so that you have a pen 9" long.
- Remove long edge of barbs. Tear them off, but stop before you strip it too close to the barrel. Carefully cut the barbs off that are near the barrel to prevent inadvertently weakening the barrel.
- Use a knife to gently scrape the waxy surface off the barrel.
- Cut the tip of the barrel off with scissors.
- Fish out any material that's in the barrel with the crochet hook.
- Soak barrel end of the quill in water to soften it.
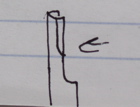
- Take out a 1" section of the barrel, making the cut curve at the bottom. Start 1" from the tip, cut into the quill half way, curve upwards and cut straight out to the end.

- Halfway down the 1" slit, do the same thing again taking out another section.

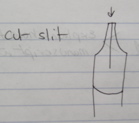
- Put the front of the quill on a cutting board and cut slit in the center of the nib.

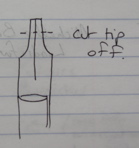
- Cut the top of the nib off to form a squared surface.

- Put the pen back down angled towards the cutting board. Take a bit off the tip at an angle to sharpen it.

Tips:
- As they dry out, the nibs will splay. Put it in water and they will straighten out and go together.
- As the pen stops writing well, it can be re-cut until there is no more barrel left on the quill.
- Writing on a slanted surface makes the ink flow better. Writing on a flat surface the ink tends to make blobs, unless you are sparing with your ink, in which case it dries very quickly. With the paper slanted, the pen is almost parallel to the ground, so the paper wicks the ink out of the pen, rather than gravity helping it blob onto the paper.
- Uncial scripts and Anglo-Saxon scripts that combine flat strokes with angled strokes are easier to do with a quill than a metal nib pen because the quill is more flexible.
Parchment and Vellum
Parchment and Vellum are used generically by academics to mean "treated animal hides." But to modern calligraphers the terms have specific meanings.
Parchment is sheepskin. It can be split into two sheets, it is thin and white. But is greasy and can't be erased. (Which is why it was used for court documents.) Goatskin can be used but is coarser and is used more frequently for binding books.
Vellum is calfskin. It provides the best writing surface. You can get finer sharper letters on it than on parchment or paper.
How is it prepared?
The animal hide is treated by sticking it in a big vat of lime for a few days and agitated frequently. (Sometimes they just buried the skins in the Middle ages). This causes the hair to slough off and the skins become somewhat gelatinous.
They are then put on stretcher frames and kept pulled tight. While they are stretched they are scraped with a half moon shaped knife to get a more uniform thickness.
The skin on the neck, tail and legs is thickest. It is also a bit thicker along the spine. When binding a book, you would not want to have the fold line on the animals spine because then the spine of the book would be very thick, while the pages were thinner. (The Lindinsfarn gospels were carefully cut so that they did not have the thick leather in the spine, even though that is not the most economical use of the hides.)
http://www.bl.uk/onlinegallery/ttp/digitisation3.html
Vellum meant for writing is bleached.
The two sides of Vellum
The hair side is more colored, has more texture. This is the best side for writing and painting.
The flesh side is waxy and smoother, but does not hold ink and paint as well. (Also does not have a good "tooth" to it.
Slunk parchment
The term slunk parchment was originally used to mean hides from stillborn animals. It is very very fine. (However, this can also be achieved by careful scraping.)
Preparing to Write on Parchment or Vellum
- Once processed, the hide's natural oils will continue to come to the surface. This must be removed by rubbing it lightly with "pounce," (a gritty powder made of pumice and cuttlefish.)
- The surface should also be lightly rubbed with Gum Sandarac (a bag of yellow resin crystals). When rubbed on, it acts as a resist and slightly shrinks all lines made on the surface. (Lines become very fine, clear and crisp.) Gum sandarac was sometimes applied to paper, since paper quality was sometimes very poor, and it would prevent the ink from absorbing into the paper and blotting.
Information from:
"Gilding & Illumination Class" taught by Patricia Lovett. Manuscript School London. June 23, 2005.
Who is Patricia Lovett?
Patricia Lovett is a professional calligrapher who works extensively with the British Library preparing reproduction pages from Medieval manuscripts. Her hands are often filmed writing with a quill pen for period movies. (The hands writing in Elizabeth R. are hers.) She has written several books on calligraphy and illumination and has collaborated with academics on their research about period manuscripts.
Shops Lovett Recommended:
L. Cornelissen
106 Great Russell Street
London WC1B 3R4
Phone: 020 7636 1045
Fax: 020 7636 3655
Email: info@cornelissen.com
Good for Gold, quills, colors, burnishers
The Swanherd or The Swanery
Abbotsbury
Dorset
(Quills)
Cowley's Parchment Works
97 Caldecote Street
Newport Pagnell
Berks MK16 ODB
Phone: 0198610038
Some of Lovett's Books:
Companion to Calligraphy, Illumination & Heraldry
http://www.bl.uk/acatalog/Catalogue_ISBN_0712346805_369.html
Historical Source Book for Scribes
http://www.bl.uk/acatalog/Catalogue_ISBN_071234618X_373.html
Tools & Materials for Calligraphy, Illumination, and Miniature Painting
